Office 365 Transfer OneDrive Files to Another User using 3 Different Techniques
Table of Content:
Overview to OneDrive
Before proceeding to the solution to perform Office 365 transfer OneDrive files to another user, let’s have a brief introduction to OneDrive. OneDrive is a free cloud storage facility launched by Microsoft in 2007. Earlier it was known as SkyDrive, but due to some trademark dispute, later on, January 27, 2014, it was renamed as OneDrive.
It allows users to store files, and personal data in Cloud. Users can share files, and sync files across all internet-connected devices. Users can sign up for a free account and it facilitates 5 GB of free storage for every user account. OneDrive for business – It enables the organization to provide a cloud space to its employees and manage its usage from a central location.
Why There is a Need to Transfer OneDrive Files to Another User?
In an organization, there can be various situations like acquisition, merger, or divestiture, that can create a need to perform Office 365 admin transfer OneDrive files to another user.
- Change in job role: If an employee changes his/her job role or department within the organization, it might be necessary to transfer the ownership of OneDrive files to another user who is responsible for that role or department.
- The departure of an employee: When an employee leaves the organization, it is important to transfer the ownership of the OneDrive files to another employee or administrator to ensure that the files are not lost and can be accessed by the relevant people.
- Collaboration: Sometimes, it is necessary to collaborate with another user or team, and therefore, the files need to be transferred to that user or team’s OneDrive account. This is especially important when working on projects that require sharing of documents and files.
- Security reasons: In some cases, it may be necessary to transfer files to another user for security reasons. For instance, if an employee is terminated for any reason, their access to OneDrive should be terminated, and the files they had ownership of should be transferred to another user to prevent any data loss or security breaches.
- Administrative purposes: In some cases, administrators may need to transfer OneDrive files to another user for administrative purposes such as account merging, moving to a new domain, or transferring ownership to another user.
 Hence, in the coming section, we have discussed all the possible solutions for this operation.
Approach: 1. Download & Upload to Perform Office 365 Transfer OneDrive Files to Another User Account
In this method, the users can download their data directly from their source account and upload it to the destination account in O365 by following these steps:
Step 1. Log in to your source OneDrive account using your OneDrive account credentials. Create a folder by the name Backup.
Step 2. Now select all the files and documents and copy them to the Backup folder. Click the “Download” button to download this folder to your local computer.
Step 3. Then, log in to your destination OneDrive account using your OneDrive account credentials.
Step 4. Now in order to transfer files from OneDrive to another user, click on the “Upload” button to Upload the Backup folder to the destination OneDrive account.
Note: This method is not suitable for a large data transfer within OneDrive accounts in O365. Moreover, you get to encounter some errors like – failing to download, being stuck while downloading, or a network error. Which can be a hassle when you are in hurry.
Things to Keep in Mind Before Using PowerShell to Move OneDrive Files to Another User Account
- It could take a while
Every file and folder takes a minimum of one or two seconds to process. If you have thousands of files, and you are running out of time, then this approach is not for you.
- It works with an internet connection
When we run PowerShell scripts, it downloads the file before uploading them to the destination user account. If your internet connectivity is slow then you would have to leave it on a cloud-hosted server.
- Size limit of 250MB
PowerShell has its limitation as it cannot send files larger than 250 MB to SharePoint.
- Two Factor Authentication should be disabled
PowerShell script does not work with multi-factor security authentication on the Admin account. In order to perform Office 365 transfer OneDrive files to another user, the users have to create a temporary admin account without MFA for this project.
Prerequisites of PowerShell Scripts For Office 365 Admin to Transfer OneDrive Files to Another User
In order to run these scripts, users need to install the following PowerShell Module:
- SharePoint Online Management Shell
It modifies the permissions in the user’s OneDrive site collections. Users can download and install it from here
- SharePoint PnP PowerShell Module
This module will provide the cmdlets and we will use it to transfer the files and folders within OneDrive accounts.
In order to install it, open the PowerShell window as an administrator and run these cmdlets:
1 Install-Module SharePointPnPPowerShellOnline -Force
MSOnline V1 PowerShell Module
Users will also need this module.
In order to install it, open the PowerShell window as an administrator and run these cmdlets:
1 Install-Module MSOnline -Force
Approach: 2. Using PowerShell to Transfer OneDrive Files to Another User
Run the below PowerShell script for this operation to execute the task manually.

Approach: 3. Automated Solution to Transfer OneDrive Files to Another User
Afraid of these cmdlet scripts? Don’t worry we have already taken the plunge for you. As it is evident from the above section that these scripts have their limitations, and it is not a reliable approach to performing this operation. It requires a lot of technical knowledge and a minor mistake in these scripts can result in an error.
Therefore, it is suggested by many industry experts use an automated professional utility over the PowerShell method to perform this type of data transfer project in Office 365. Hence OneDrive to OneDrive Migration Tool is the best match to transfer OneDrive files to another user in Office 365.
It is a user-friendly & reliable tool that ensures a smooth file transfer experience within OneDrive accounts with maximum security in the minimum time possible. Moreover, you can also perform Office 365 tenant-to-tenant migration using this utility with maximum data security.
Steps to Perform Office 365 Transfer OneDrive Files to Another User
Step 1. Download and Open the utility. Now from the given options to select Migration Platform, select Office 365 as Source and Destination.
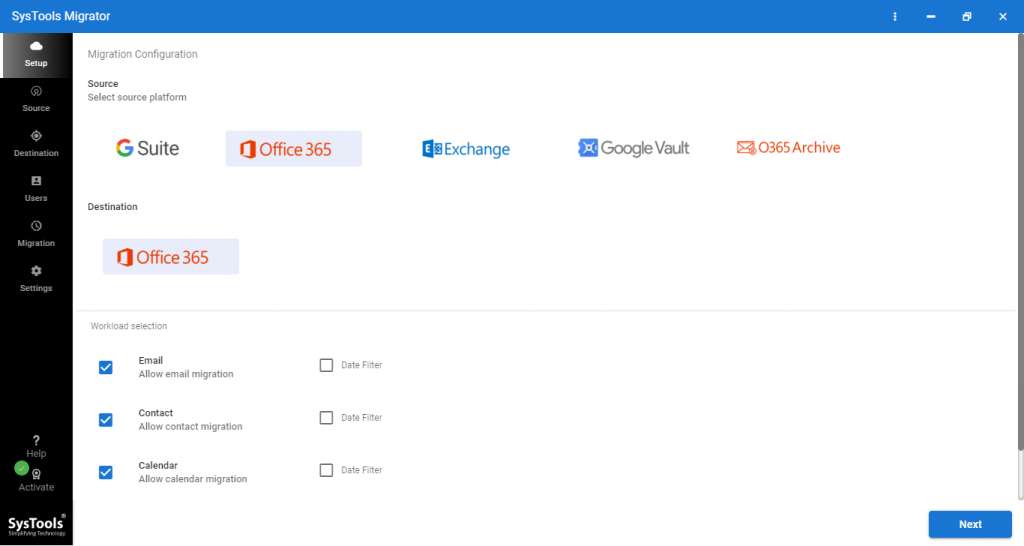
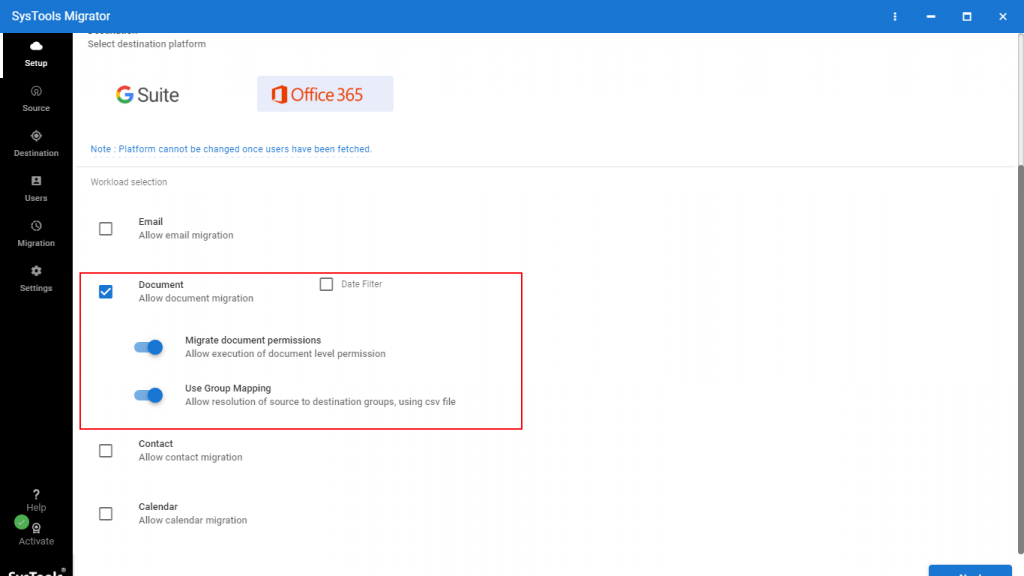
Step 2. This utility is capable of performing multiple migration projects in O365. And in order to migrate only the OneDrive data, Check the document option from the screen and enable migrate document permissions. Users can also transfer data selectively by using the date-based filter provided in this tool.
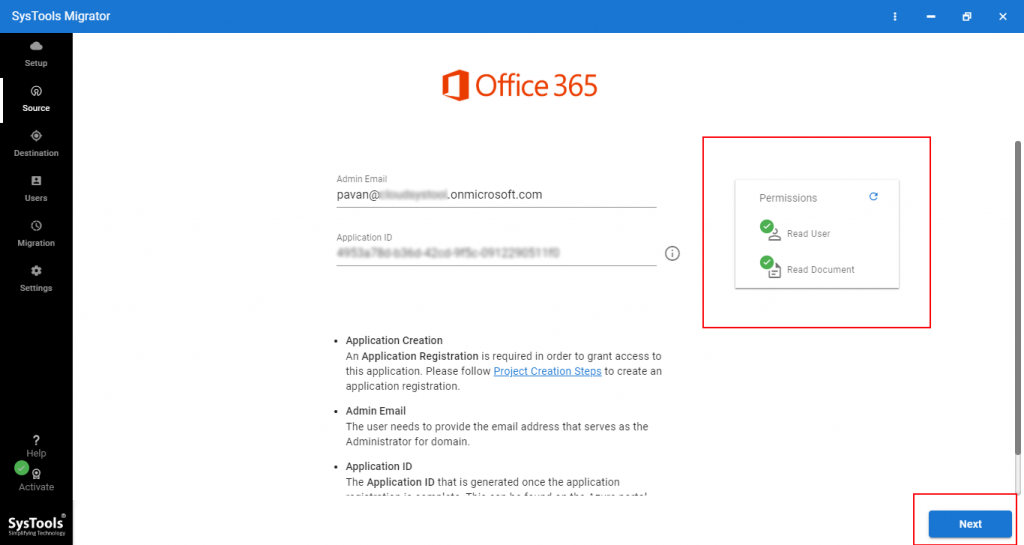
Step 3. Now, in the following fields, log in with admin credentials. Log in with source Admin ID and Application ID and then, click next to perform Office 365 transfer OneDrive files to another user.
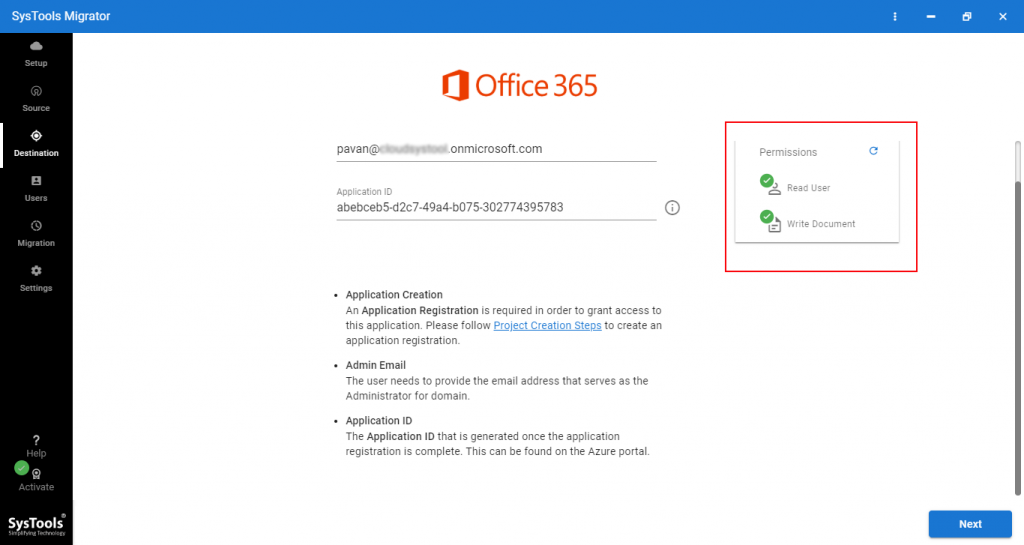
Step 4. Following the last step here, log in with destination admin credentials and click Next.
Step 5. In order to create account mapping, this utility provides us with three types of mapping options such as Fetch Users, Import Users, and Download Template. Users can select any of these options accordingly.
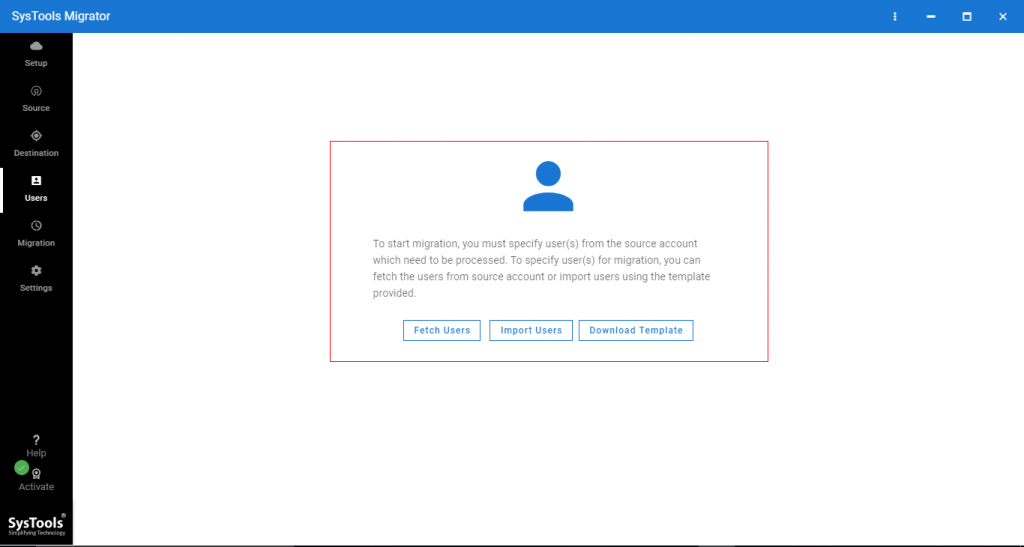
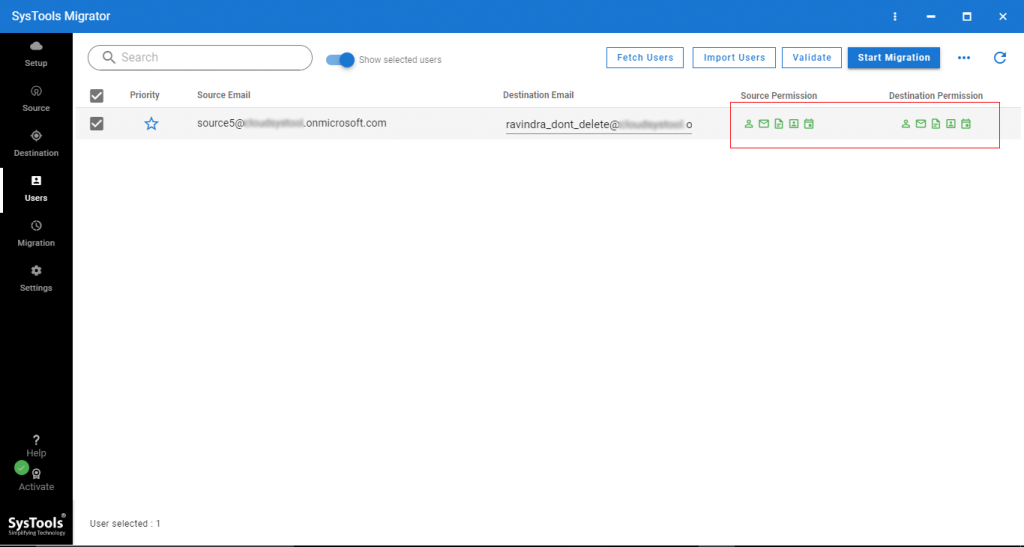
Step 6. Once the mapping creation is done. Click on the validate buttons to validate permissions then, you are all set to go. Now, Click on the start migration button, in order to start the migration. The migration will start and after a few minutes, the file transfer would be done.
Also Read: How to Move Channels in Teams? Follow this quick guide!
Concluding Words
Transferring OneDrive files to another user in Office 365 can be an easy and less time-consuming task if we use the right approach for it. However, the manual method can be used for small sizes of files. For large data files, it’s always recommended to use a reliable and secure tool to perform this transition.
In this write-up, we have come up with all the possible solutions to perform this operation. However, using the above-mentioned tool one can easily perform Office 365 transfer OneDrive files to another account, without any hassle in the minimum time possible.

