Compress Exchange Server 2016/13/10/07/03 EDB Files.
In today’s world, largest Exchange EDB file is a most common issue raised by many users. The major cause of this problem is the occurrence of corruption in .edb files due to the presence of multiple reasons like virus attacks, improper system shut down, etc. Therefore, there is a need to compact the .edb files in a real manner. In the following segment, we are going to discuss the manual solutions for compress Exchange server EDB files and much more in detail.
EDB is the main repository for the mailbox database. It contains all data items such as email, attachments, folders and so on. Such files are formatted by using a b-tree structure that can access many pages rapidly at a time. Each .edb files have a corresponding STM files, which contain the actual .smtp email messages. In some situation want to compress Exchange server 2016/13/10/07/03 files that are included below.
Why to Shrink Exchange EDB file?
The Exchange EDB files will grow automatically in size as the data inside the files will be increased. However, cannot reduce EDB file size if the unnecessary data has been removed from them.
For an instance, the size of .edb file is 20 GB and we have deleted 5 GB mailbox data or move it to any other database, the size of .edb file will remain 20GB. Moreover, 5GB white space has been created in the database and that space could available for the new data to be written without increasing the file size.
Solution: How to compress Exchange Server 2016/13/10/07/03 EDB File
In case, if .edb file size getting too larger then, the server has run almost out of space. Users can follow the below steps:
- Creating the new Mailbox database and then, move the data from existing Mailbox to a new Mailbox.
- Shrink Exchange EDB file by performing the Offline defrag.
- Move the desired location of the Mailbox Data
There are several of risk factors in the mailbox migration process. It will create a large transaction log file and will take few days to complete the overall process. In this blog, we will discuss certain steps to compress Exchange server using Eseutil and also moving the location of the Mailbox database.
Defrag Exchange Server Database with Eseutil
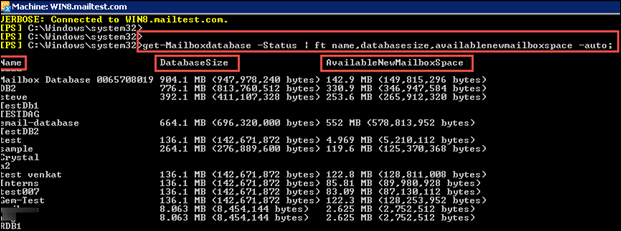
Determining Free White Spaces
Users can analyze the size of the mailbox and the presence of white space by executing the command given below in Exchange Management Shell
Through this, users can reclaim the white space by shrink Exchange EDB file with using Eseutil utility to defrag Exchange Server.
Prerequisites
- In such way to split Exchange Mailbox database by using Eseutil, the data must be dismounted at the duration of defragmenting. It means that users unable to access their email when they are defraging it
- A new file has been created during the defrag process and the previous file, latest file and a temporary file, which has generated by Eseutil would exist. So users have some disk space for such type of files to perform the defragmentation. If users do not have a free disk space then, they need to specify a different temporary files location while running Eseutil commands. These are the prerequisites by using Eseutil for the compress Exchange Server file process
Procedure
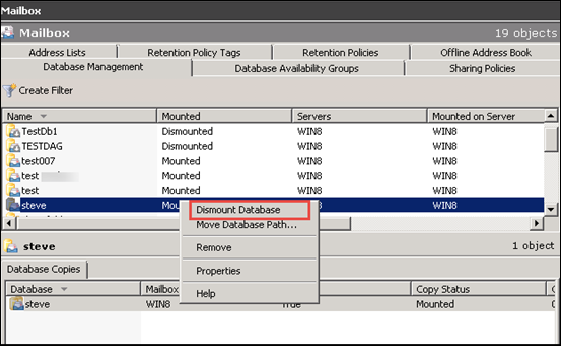
- On Exchange Management Shell, users can run the following command to navigate and dismount the EDB Mailbox database. Since the Mailbox data must be temporarily Dismount before split Exchange Mailbox database.
- Users can also dismount the mailbox database by using Exchange Management Console. For this, choose the Mailbox where users want to move, click-right on it and then, choose the Dismount Database for compress Exchange server file
- Now running the Eseutil command to defrag Exchange Server EDB files
- Mount the mailbox database by running the below script:
- Now users can verify the database size and also available white space of selected mailbox data. Users can view the result that the size of file is too small and the white space has gone. Thai is here the process of compress Exchange server 2016/13/10/07/03 EDB files is done.
As the Eseutil has been completed, run the complete backup of the database.
Move the Database Using Exchange Management Console
For the part of Shrink Exchange EDB file, Go through the following steps to transfer the data with exchange Management console:
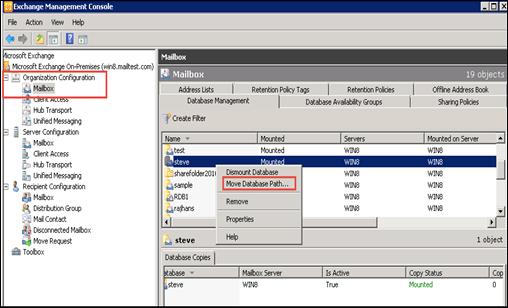
- First, open the Exchange Management Console under the Organization Configuration and choose the Mailbox
Select the specific Mailbox that user want to move, click-right on it and then choose Move Database Path option
- After selecting Move Database path, now, Move Database Path wizard will appear where users can enter a new path for the log files and data items. Once the path of Exchange EDB file has been changed, Press on Move icon
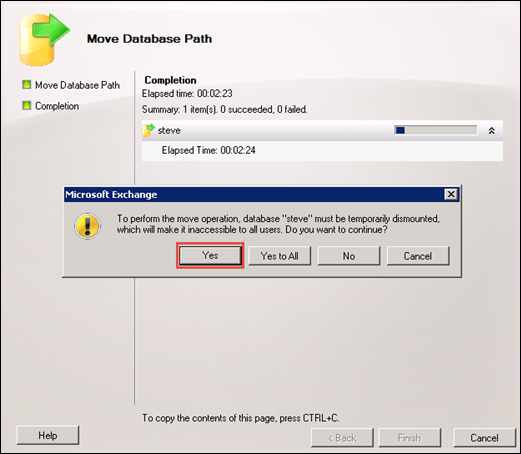
- As users choose the Move option, Microsoft Exchange window will inform the users that the database might be dismounted temporarily to execute the Move Database operation. Next, users click Yes option to proceed the process of defrag Exchange server EDB file.
- When performing the move operation it will take some time, which totally depends on the size of a Mailbox. Once the Moving operation has been completed, users can view the entire information. Then, click on the Finish to close the window and compress Exchange server EDB files is done in efficient way.
According to the above steps, users can easily move their EDB files by using Exchange Management console. So it will lead to reduce EDB file size.
Conclusion
Exchange Server has been used in most business organizations, which can save emails, contacts, calendars etc, in a proper way. However, if the size of database increases, it may lead to the corruption of EDB files. Along with, we have discussed certain reasons and possible solutions that will help to compress Exchange Server 2016/13/10/07/03 database (.EDB) files. Here there is a tool for this purpose Exchange Recovery Software. This tool perform the compress process easly.


